Make it easy for recipients to understand alerts and requests by including customized messages placeholders or limiting the information so they see only what they need.
You can set workflows to run weekly, daily, or at specific times.
Users with Editor-level permissions can only create, edit, or delete alerts or reminders with themselves as the recipient. Learn about workflow permissions.
To edit an existing workflow
- In the upper-left area of the sheet, select Automation > Manage automation workflows.
- Hover over the workflow you want to edit and select Edit.
- Edit the alert message content in the workflow builder.
You must set the Trigger block to When triggered to use dynamic placeholders in a change-based workflow.
Customize a message in a workflow
Select Customize message and type your message in the corresponding field.
Keep these things in mind as you write custom messages:
- To create placeholders and customize the message, use braces: {{Task Name}}.
- The Customize message box has a limit of 2,000 characters.
- When you select Message only, a custom message is required. Otherwise, the message body is optional.
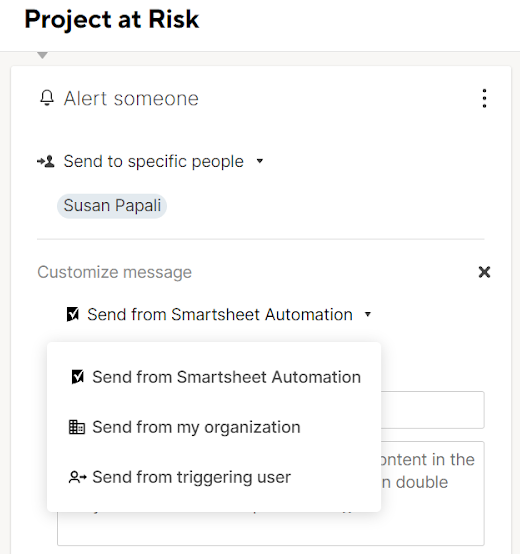
- Use the Send from dropdown to set what appears in the From line of the message.

Customize the sender's name
The Send from dropdown menu lets you select who you want the alert or message to come from.
The option to Send from my organization is only available for users with Enterprise plans and above.
The table shows the Send from name and reply-to addresses for each alert type.
| From name option selected | From name notification email | Reply-To email address |
|---|---|---|
| Send from Smartsheet Automation | From name is Smartsheet Automation. | Sheet owner's email address |
| Send from organization name | From name is your organization’s name set by your System Admin. | Sheet owner's email address |
| Send from triggering user (for Alerts) | If an alert is triggered by a single user’s change(s) in your sheet, that triggering user’s name is the From name for the notification email. | The reply to is the triggering user's email address |
| Send from triggering user (for Alerts) | If an alert is triggered by multiple users’ changes in your sheet or if the alert is time-based, i.e., a reminder, then the sheet owner’s name is the From name for the notification email. | The reply to is the sheet owner's email address |
| Send from sheet owner (for Update and Approval Requests) | From name is the sheet owner’s name. | Sheet owner's email address |
Select what’s included in an alert or request
Message includes section
The Message includes section at the bottom of the page provides three options. Here’s what you need to know:
- Links to sheet and all fields: Use this option to include all fields in the sheet.
- Links to sheet and specific fields: Choose only the fields the user needs to see.
- Message only: Use this if you only need to add a message to the alert.
If you’re working with people who don’t use Smartsheet, choosing the Links to sheet and all fields option can be helpful.
Comments and attachments in alerts
- Alert actions in time-based workflows don't include comments and attachments.
- Alert actions in change-based workflows only appear when the attachment or comment is modified during the trigger event. The alert doesn't include attachments and comments that existed before the trigger event.
- Update request and approval request actions include all new and existing attachments and comments.
Row hierarchy in alerts
When a change-based alert is triggered for a child row, the parent row is included in the notification. When a time-based alert is triggered for a child row, the parent row is not included in the notification.
Work with placeholders
When you use placeholders (field names in braces), Smartsheet adds the corresponding unique cell data to the alert message for the row.
- Placeholders in the Approval Requests alert generate a separate notification for every row.
- Placeholders in Alert someone or Update Requests actions in change-based workflows generate separate notifications if six or fewer rows are triggered simultaneously. The system removes the custom subject and body if seven or more rows are triggered simultaneously.
- With the Message only alert type, any simultaneously triggered rows are combined into a single notification.
- If there are placeholders entered in the custom message for a time-based Update Request, no custom message is sent.
- Placeholders can’t be used when the Run workflow setting is hourly, daily, or weekly.
Time-Based Alerts: Behavior with placeholders
When you set up an automation workflow to trigger When a date is reached and select a date in the trigger, the notification behaves differently depending on how many rows meet the criteria:
One Row: Placeholders in the subject line will display the actual values from the row. The email body will include the custom message you set up, with placeholders populated by the row data, followed by the row information.
Example: A subject with the placeholder {{Status}} shows Task Complete, if that is the value in the row's Status column.
Multiple rows: All rows will be grouped into one email notification.
Subject: The placeholders in the subject will be replaced with a default subject, for example: Reminder: [Sheet Name].
Email Body: The email will contain one custom message for each row, including any placeholders used. After each message, the row details (as configured in the custom message section) will be listed at the bottom of the email.